
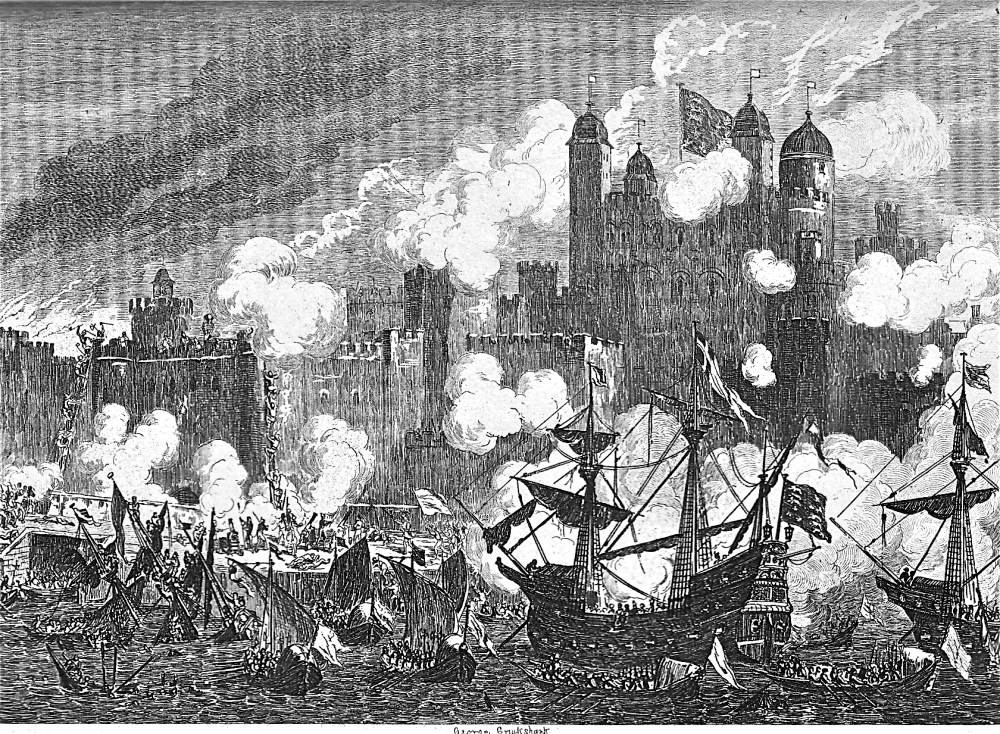
Attack on St. Thomas's Tower by the Duke of Suffolk. — George Cruikshank. Tenth instalment, October 1840 number. Seventy-third illustration and and thirty-first steel-engraving in William Harrison Ainsworth's The Tower of London. A Historical Romance. Illustration for Book the Second, Chapter XXIX. 10.2 cm high x 14.2 cm wide, framed, facing page 314: running head, "Terrific Scene on the River." Although no such assault probably occurred during the Kentish uprising, Ainsworth and Cruikshank use the thunderous battle scenes in this chapter to showcase the intrepid bravery of Cuthbert Cholmondeloy and Sir Thomas Wyat. Moreover, Cruikshank has visually foreshadowed this naval bombardment, "a sublime but terrific spectacle" (315) in the central tapestry behind Simon Renard in Sir Thomas Wyat dictating terms to Queen Mary in the Council just pages earlier in this same instalment. [Click on the image to enlarge it.]
Scanned image and text by Philip V. Allingham. [You may use this image without prior permission for any scholarly or educational purpose as long as you (1) credit the person who scanned the image and (2) link your document to this URL in a web document or cite the Victorian Web in a print one.]
Passage Complemented
It was rumoured among Dudley's men, and the report stimulated their ardour, that the Duke of Suffolk had taken Saint Thomas's Tower. This, however, was not the case. After the embarkation of the troops as before related, the squadron under the command of Admiral Winter, accompanied by a number of galleys, and wherries, made its way slowly to the Tower. Owing to the necessary delay, the tide had turned, and the larger vessels had to be towed up the river by the smaller craft.
On their arrival they were immediately perceived by the sentinels, who opened a fire upon them, which was instantly returned. This was the commencement of the siege, and served as the signal to Dudley, and likewise to Wyat, of whose movements it will be necessary to speak hereafter.
Before the squadron came up, the Duke of Suffolk embarked in a small galley, and accompanied by several wherries filled with soldiers, contrived, by keeping close under the wall of the wharf, to effect a landing, unperceived, at the stairs. Taken by surprise, the guard fell an easy prey to their assailants, who seizing the cannon placed there, turned them against the fortress.
While this was passing, several boats landed their crews at the eastern end of the wharf, and many others speeded towards it from all quarters. In a short time, it was crowded by the insurgents; and notwithstanding the tremendous fire kept up against them from the whole line of battlements — from Traitor's Tower — and from all the fortifications within shot, they resolutely maintained their ground.
Directing the attack in person, and exposing himself to every danger, the Duke of Suffolk displayed the utmost coolness and courage. The fight raged furiously on both sides. Several boats, and one of the larger vessels, were sunk by the guns of the batteries, and the ranks of the insurgents were greatly thinned. Still there was no symptom of irresolution exhibited; nor did they relax for a moment in their efforts.
Scaling-ladders were placed against the walls of Traitor's Tower, and crowded with climbers, while a gun-boat entered the dark arch beneath it, and its crew commenced battering with axes, halberds, and poles, against the portcullis and water-gate. Another party had taken possession of the buildings opposite the By-ward Tower, and were trying to reach the drawbridge, which, it is almost needless to say, was raised. Added to these, a strong body of Essex men, having congregated at Limehouse, approached the fortress by Saint Catherine's, and the lane leading to the Flemish church, and were striving to force the Iron Gate and the eastern outlet of the wharf.
At this juncture, an occurrence took place, which, while it disheartened the besieged, tended greatly to animate the assailing party. At the south-west corner of the wharf stood a row of small habitations separating it from Petty Wales. One of these was presently observed to be on fire, and the flames rapidly spread to the others. Shortly afterwards, a tremendous explosion took place. A building was blown up, and the fiery fragments tossed into the river and moat; while across the blazing ruins, with loud shouts, rushed a party of men from the troops under Sir Thomas Wyat.
This was the explosion that reached the ears of Dudley and his band. Rushing to the assistance of their friends, the new-comers seemed determined to carry all before them, and such was the effect of their sudden appearance, that the besieged for a moment gave way, and a small body of the insurgents gained a footing on the roof of Traitor's Tower. But the next moment, the royalists rallied, drove off their assailants, and the fight continued as obstinately as before.
It was a sublime but terrific spectacle, and one not easily effaced from the remembrance of those who beheld it. The ruddy light cast upon the water by the burning houses, and serving to reveal the tall vessels — the armed boats — the sinking craft and struggling figures with which it was covered — the towers and battlements of the fortress pouring forth fire and smoke — the massive pile of the ancient citadel, which added its thunder to the general din, — the throng of warlike figures engaged in active strife on the wharf, or against Traitor's Tower — constituted a scene of intense, though fearful interest — nor did the roar of the cannon, the clash of arms, the shouts and cheers of the combatants and the groans of the wounded, detract from its effect. [Chapter XXIX. — "The Siege of the Tower," pp. 314-15]
Commentary
The Historical Novel as instituted by Sir Walter Scott — The Waverley Novels — established the convention of involving the fictional hero in actual battles in order to show his resourcefulness and courage, and to bring history to life through the lived experience of a character with whom the reader is familiar. That focal character in Ainsworth's historical romance is Cuthbert Cholmondeley, whose political allegiance to Lady Jane Grey remains constant throughout the novel, and whose fortunes engage the reader from the opening to the closing chapters. However, as with Scott, the story also has a secondary, historical hero, Sir Thomas Wyat, leader of the Kentish rebellion against "The Spanish Match." The fierce battles at the north walls of the Tower of London and the naval bombardment depicted here enable Ainsworth to generate considerable suspense by placing both protagonists in grave danger.
Thus, the novelist must produce an exciting plot-line that actually deviates from history, for Ainsworth is not merely recounting or dramatizing history; rather, he is romanticizing it, sensationalizing the period of 1553-54. In point of fact, although Wyat's forces infested the suburbs south of the Thames, they were never able to launch a concerted assault on the Outer Ward of the Tower of London such as we see in the next illustration, in which Wyat and the rebels attack the Tower. Since an account of strategic withdrawals on either side is not the stuff of romance, Ainsworth must have felt compelled to offer exciting battle scenes worthy of the pageant of Tudor history that he has promised in the preface, and that Cruikshank has realised with gusto: Attack upon the Brass Mount by Lord Guildford Dudley, Attack upon St. Thomas's Tower by the Duke of Suffolk, and Sir Thomas Wyat attacking the By-Ward Tower in Chapter XXIX. "Desirous of exhibiting the Tower in its triple light of a palace, a prison, and a fortress" ("Preface," p. iv), Ainsworth must furnish a narrative that shows the Tower of London functioning in all three ways. Unfortunately, despite his martial valour and conflicted patriotism Wyat makes his final appearance in the novel as a victim of state-sponsored torture in Elizabeth confronted with Wyat in the Torture-Chamber, when his final act of self-sacrifice is his refusal to implicate the Princess Elizabeth in the recent insurgency.
Robert L. Patten in his chapter on Ainsworth and Cruikshank's collaboration on these sweeping historical scenes makes the case that the artist's image prompted the writer's description of the scene:
The three etchings depicting Wyat's rebellion — oblongs 3 3/4 X 5 11/16" (done in the manner of giant historical canvasses) that had to be printed sideways on the page — demanded almost infinite attention.Recovering from an illness which had set him back three or four days at the beginning of September, Cruikshank summarized his representation of the "Attack upon Saint Thomas's Tower by the Duke of Suffolk" (fig. 28):
The Flotilla consisting of several armed ships — number of galleys & small craft congregate at Deptford — take in the troops & proceed with the tide to the Tower — the small boats creep among under the wharf wall — landing the men at the stairs who immediately attack "St. Thomas's tower" — at the same time that a party are attacking "the Traitors gate". Meanwhile the other boats land their men at the East end, & indeed all along the wharf seizing the cannon placed there of course, and turning them upon the Fortress — the guns from the battlements are now in full play — The party on the wharf are covered or supported by the guns from the Ships — one of which is sunk — several Galleys — &c are sunk also — at the same moment of the water side assault — a strong body of Essex men who had congregated at Limehouse — attempt to force the Iron gate & that also leading to the wharf they approach by "St. Katherines" and the lane leading to the "Flemish Church" — ["Cruikshank to Ainsworth," 14 September 1840, cited by Patten, pp. 141-42]
Patten makes the case that, since the text corresponds closely to the wording in the Cruikshank letter, here the artist's conception determined the text, rather than the other way around, as was the usual case in Victorian illustrated novels. The style that Cruikshank adopted in these battle scenes, as Patten notes, is that of "romantic history painting" (143) of the type which Hogarth used for his illustrations for Samuel Butler's Hudibras (1725 edition) and Laurence Sterne's Tristram Shandy (1760 edition). The qualities that Cruikshank, heretofore a caricaturist who had relied upon line-drawings, are those of eighteenth-century mezzotints of historical subjects: "breadth, solidity, atmosphere, spaciousness, and factual authenticity" (Patten, 143). Because the wood-engravings are merely a record of how the Tower looked in 1840, Cruikshank did not have to embue them with these qualities; consequently, whereas he had to send the tracings of the engravings to the author by the fifteenth of the month for his approval, he had another week on which to see that the wood-engravers had done their work properly, all leading to distribution of the monthly instalments to the book-sellers by the last Saturday of the month.
Renouncing caricature entirely, Cruikshank approaches his material with a high seriousness that does not admit situational or character comedy in a series of battle scenes which William Feaver describes as "formidably detailed reconstructions of alarms and skirmishes" (249) of the kind he developed for W. H. Maxwell's The History of the Irish Rebellion (1845). The focal point of Cruikshank's composition is the galley under command of the Duke of Suffolk, lower right, and immediately below it a pair of wherries. Cruikshank includes a sky in conflict (upper left) and white clouds of gun-smoke to energize his image of the engagement beneath the Outer Ward on the Thames side of the White Tower, complementing the battle on the landward side depicted in the previous illustration.
These battle scenes and the interview between Queen Mary and Wyat that precedes them demonstrate Cruikshank's "technical excellence . . . in their fidelity to historical detail" (E. D. H. Johnson, p. 18) in terms of arms and armour, architectural setting, and here the depiction of the various classes of shipping involved in the assault, giving the reader a strong sense of the sweeping narrative on the facing and succeeding pages. The text furnishes Cruikshank with plenty of material for a grand historical canvas, although the scale of the book illustration does not permit Cruikshank to move in for a close-up and retain the effect of a large-scale canvas.
Cruikshank's work on this particular illustration would have required research far beyond his monthly walks with Ainsworth around the Tower of London. He must have studied illustrations of late sixteenth and early seventeenth-century naval vessels and river craft, particularly paintings of naval vessels which Henry VIII and Elizabeth I commissioned to bolster the country's ability to fight the French from 1547 onward. Since the cost of maintaining naval vessels was considerable, Henry VII had had a fleet of only five ships, to which his son, dubbed the "Father of the English navy," added such famous galleons as the ill-fated The Mary Rose (1511). Gradually he built up the fleet to twenty vessels, each costing about £3,000 a year; by the time of his death in 1547, England boasted a fleet of about eighty the carrack-type warships that Elizabeth would employ to defeat the Armada in 1588. Two such vessels are evident in the present illustration.
The three-masted carrack which Cruikshank has made his focus has cannons projecting out of the gun-ports on the lowest deck, high castles fore and aft, and a low-waist opening in the middle, all consistent with Henry VIII's flagship, The Mary Rose (re-built in 1536). On the far side of the vessel, nearer the Middlesex shore, great clouds of white smoke indicate that the master gunner has just fired a broadside at the shore defences. The early carracks had larger forecastles than the vessel in the illustration, which suggests that Cruikshank's model was a post-1560 carrack — Elizabethan seadog John Hawkins experimented with much smaller forecastles in order to make his carracks more maneuverable. A possible model is Sir Francis Drake's Golden Hind. Whereas Henry VIII had only five galleys in his fleet, he had fourteen pinnaces, sixteen galleasses, and thirteen armed row-barges of the type seen at the bottom margin. The small, oared vessels to the left are galleasses, although Cruikshank gives each only a single lateen sail. Gunners on the shore (left of centre, near Traitor's Gate and St. Thomas's Tower) using brass cannon seem to have been successful in sinking four such vessels (lower left).Cruikshank may well modelled on such Dutch canvasses as The Raid on Chatham (Raid on Medway), 17-23 June 1667 (1669), by Jan van Leyden, based on an incident in the Second Anglo-Dutch War (1664–67),and such historical engravings as The Storming of Sheerness Castleby Willem Schellinksfrom the Golden Age of Dutch sea-power.
These mid-1840 illustrations are the high point in Cruikshank's new "documentary" style that he initiated in Ainsworth's Jack Sheppard (1839) before applying it to an historical work without a fictional component, Maxwell's History of the Irish Rebellion. Although his work as a caricaturist for Punch was, as Feaver remarks, "on the wane" (249), Cruikshank would never become a true realist in the sense that the New Men of the Sixties such as Fred Walker and Fred Barnard would be, he would tackle a serious issue in The Bottle (1847) and The Drunkard's Children (1848), the disastrous personal and social consequences of alcoholism.
Bibliography
"Ainsworth, William Harrison." http://biography.com
Ainsworth, William Harrison. The Tower of London. Illustrated by George Cruikshank. London: Richard Bentley, 1840.
Burton, Anthony. "Cruikshank as an Illustrator of Fiction." George Cruikshank: A Revaluation. Ed. Robert L. Patten. Princeton: Princeton U. P., 1974, rev., 1992. Pp. 92-128.
Carver, Stephen. Ainsworth and Friends: Essays on 19th Century Literature & The Gothic. 11 September 2017.
Department of Environment, Great Britain. The Tower of London. London: Her Majesty's Stationery Office, 1967, rpt. 1971.
Chesson, Wilfred Hugh. George Cruikshank. The Popular Library of Art. London: Duckworth, 1908.
Feaver, William. "'At It Again': Aspects of Cruikshank's Later Work." George Cruikshank: A Revaluation. Ed. Robert L. Patten. Princeton: Princeton U. P., 1974, rev., 1992. Pp. 249-258.
Golden, Catherine J. "Ainsworth, William Harrison (1805-1882." Victorian Britain: An Encyclopedia, ed. Sally Mitchell. New York and London: Garland, 1988. Page 14.
Johnson, E. D. H. "The George Cruikshank Collection at Princeton." George Cruikshank: A Revaluation. Ed. Robert L. Patten. Princeton: Princeton U. P., 1974, rev., 1992. Pp. 1-33.
Kelly, Patrick. "William Harrison Ainsworth." Dictionary of Literary Biography, Vol. 21, "Victorian Novelists Before 1885," ed. Ira Bruce Nadel and William E. Fredeman. Detroit: Gale Research, 1983. Pp. 3-9.
McLean, Ruari. George Cruikshank: His Life and Work as a Book Illustrator. English Masters of Black-and-White. London: Art and Technics, 1948.
The Outer Ward." The Tower of London. https://tower-of-london-en.com/
Patten, Robert L. "Phase 3: "Immortal George," 1835–1851."Chapter 29. "The Tower! Is the Word — Forward to the Tower!" George Cruikshank's Life, Times, and Art, vol.2: 1835-1878. Rutgers, NJ: Rutgers U. P., 1991; London: The Lutterworth Press, 1996. Pp. 129-152.
Pitkin Pictorials. Prisoners in the Tower. Caterham & Crawley: Garrod and Lofthouse International, 1972.
Sutherland, John. "The Tower of London" in The Stanford Companion to Victorian Fiction. Stanford: Stanford University Press, 19893. P. 633.
Steig, Michael. "George Cruikshank and the Grotesque: A Psychodynamic Approach." George Cruikshank: A Revaluation. Ed. Robert L. Patten. Princeton: Princeton U. P., 1974, rev., 1992. Pp. 189-212.
Vogler, Richard A. Graphic Works of George Cruikshank. Dover Pictorial Archive Series. New York: Dover, 1979.
Worth, George J. William Harrison Ainsworth. New York: Twayne, 1972.
Vann, J. Don. "The Tower of London, thirteen parts in twelve monthly instalments, January-December 1840." Victorian Novels in Serial. New York: MLA, 1985. Pp. 19-20.
Last modified 11 November 2017